

Learn how to make your very own gorgeous and full burlap rag wreath like this one, with this very easy-to-follow tutorial! This is a classic wreath that you will fit just about anywhere in your home, and be used for any season!
If you follow along with The Project Pile on Facebook, you may have seen the beautiful fluffy and poofy burlap wreath that I shared the other day, that my good friend, (Courtenay from over at The Creek Line House) made and posted about… Gorgeous!
This was my inspiration, or rather motivation, to finally get my butt into gear and whip up the burlap rag wreath that I had been hoping to devise long before now!
So yesterday, I finally got my act together and came up with this really beautiful, yet really easy and fast wreath to make!
[Psst! You can follow The Project Pile on Facebook, right here!]

Last Christmas, one of my good friends showed me an awesome trick, of how to make the perfect wreath form out of a pool noodle! Sounds a little silly right?! And maybe even kind of looks a little silly in the below picture… But seriously, it’s really a super-genius hack!
[Psst! You can check out my Christmas Pool Noodle Wreath, right here!]

All that you need to do, is take the two ends of your pool noodles, and duct tape them together! Then you end up with this really amazing, perfectly circular wreath form! So cool, right?!
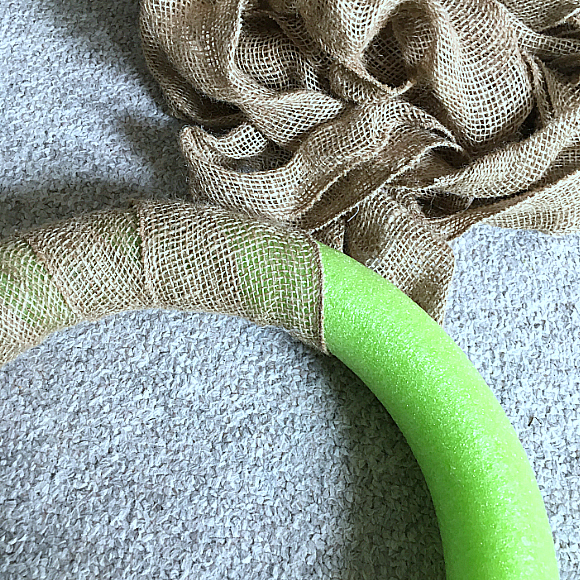
To make sure that none of the bright greenness showed through, I wrapped my pool noodle in burlap…

Ta-dah! Much better already, right?!

Here are my rags that I decided to use! The burlap is leftover from the one of the garlands that I decided to use on my Christmas tree, last year, and the other material is left over from an old rocking chair that I “tried” to reupholster back in my early DIY days…

So for this rag wreath, I wanted to see if I could speed up the DIY time a little, by making my rag strips into little bundles… It actually worked, really, really well!
All I did was cut my fabric into strips roughly around 2″ by 4″. I then cut up a bunch of skinny strips as well, to use for tying my bundles together.

I then took my strips, folded each in half, stacked them into little bundles…

And then tied the little bundles together. I made my bundles up of either three or five strips of material at a time.

For my burlap bundles, I used the same process, but instead used a little piece of twine to tie my bundles.
Oh! And if you are feeling like you really want to up the anti on the difficulty level of this project… Insert way too busy, but trying to be super helpful, baby here!

And… Insert crazy, pantless, fabric-stealing wild-child, right here!

“But Mom, this is my Elsa cape and I really need it!”
Ok. Close your eyes, and pretend your house is not being completely destroyed while you try to tackle this really fast and easy project. Count to ten… And continue!

Whew, ok…
So here is my cute little pile of fabric and burlap bundles! I didn’t actually count how many I created… I would just make a few, lay them out on the carpet the size of my pool noodle, and keep creating bundles until it looked good! (Like the most scientific procedure, ever!)

For this wreath I played around a little with the layout of my bundles, until I liked what I saw… I placed my fabric bundles evenly spaced all around my wreath.

Looking pretty good, right?! Ha. Just kidding… We still have to add the burlap!

FYI: I just used some good old hot glue to fasten all of my bundles to my wreath!

After I had fastened my fabric bundles to my wreath, I then just did the same thing with my burlap bundles… Spread them around evenly on my wreath form, and then glued them on top of my fabric bundles.

The very last thing that I did to my wreath, was add some faux berries, but you can use whatever you like! Some fall leaves, some flowers, a pretty bow, or even just leave it plain if you like!
Also, just as a little side note, I just pushed my berry stems into my pool noodle to fasten them there. This just allows me to easily switch them out when I want to change up my decor, or use this gorgeous wreath for a different season.


To be honest, it really only took me less than one hour to make this “bundled” rag wreath, and that was while chasing around my crazy baby and my super wild-child!
If you are looking for a really quick DIY project that will add a huge impact to your home, I would definitely give this a try!
HERE ARE SOME MORE FUN POSTS LIKE THIS!
The 10-Minute, 10-Dollar Pretty Fall Wreath!
An “easy as pie” DIY Rag Wreath for Spring!
Get This Burlap Printable Set for Fall, for Free!
Gorgeous Farmhouse Decor for Less than $25


*This post may contain affiliate links.
Oh my goodness, this is so beautiful! Wow! I can’t wait to make one. Thank you for walking us through step by step and creating this easy, beautiful DIY project ♡.
This is so cute! We a burlap one a few years back for fall but I’m ready for an update. This one actually seems like it would be a bit quicker!
This is adorable! (and so are your “helpers!” 😉 )
Aw I absolutely love this DIY!! Really like the neutral palate – definitely going to give it a try – thanks! Rx
Thus turned out wonderful! I love how easy it looks.
Super cute! I am super excited to try this out! I think it would be cool to change with the upcoming holidays!
This is super cute!! I must confess that I have a bundle of that same fabric left over from a chair seat I recovered, lol! Great minds…..
I love this! I’m not the best decorator but I think I can do this!
Really cute idea! Did you hot glue the fabric bundles onto the wreath? Thank you for sharing.
Love, love, love this super easy but fantastic wreath. It has my creative juices flowing for a lot of other burlap projects. Thank you so much for taking the time to share. The girls are adorable!.
Thank you for this tutorial. I try to make a wreath every month with my mom who has dementia. She cant do much now but was great at any craft. She can still tie things so this will be perfect- and since I didnt inherit her crafting abilities- it is one i think i can do. Your instructions are great- so again- thanks in advance for giving me one more memory w my mom- you are a blessing!
Sherrie, this comment made my day!! 😀 I’m so glad that you and your mom will be able to enjoy this project! You and your mom sound like wonderful people!! Please enjoy! 🙂 Xo
Love this idea. I might try alternating the fabric and burlap in 1 bundle.
Very cute and I love the textures. Good starter wreath, Thanks for the detailed instruction.
What a sweet little wreath! Really like this idea and your tutorial was easy to follow and entertaining. Your babes are totally cute!
Love the tutorial. I love this because it is different from the rest of the burlap wreaths and you can change it up. thanks for the post!!
This is so awesome, thanks for the inspiration! I love how simple and straight forward your instructions are. I love the realness of your blog! lol my kid is a former wild child so I can totally relate:)
Thanks so much, Sam! And ya… Wild children are the best! ;D