DIY Feather Boa Garland

10

Last year during the end-of-the-season Christmas sales I happened upon this beautiful white feather Christmas tree… Even though Christmas was over, I decided to purchase it and save it for next year. So when Christmas rolled around this year, I was so excited for it! And I actually decided to use it as the inspiration piece for the rest of my Christmas décor… Light, white and airy!

01

I started thinking about how I would incorporate the tree into my décor and think about what other elements would go nicely with it. It hit me at about 2am in the morning… I woke up, and thought feather boa garland!

02

And where is the best place to get white feather boas from? Why, the dollar store – of course!

03

(Notice that there aren’t any white boas in this pic… that’s because I already bought them all!)

And that’s how my white feather boa idea was born!

The next day I headed out to the dollar store, and purchased 8 white feather boas. I brought them home and was so excited to add them to my tree!

All I did was add them to my tree…

04

And then tie the ends together! Yes – it was that simple!

05

I found that it was actually easier to add them to the tree before tying them together. Then I fluffed up the feathers to hide the knots.

06

I really love how this DIY garland worked out… It certainly is light, white and airy! When the lights are turned on it kind of looks like a nice fresh snow has just fallen onto my Christmas tree!

08

Next year, I’m thinking of doing the same thing, only maybe trying a different color… like black, or red, or even purple! (Psst! Do you like my tree? Check out why I decided to spend a little more money on my Christmas Décor, this year!)

07

Just to summarize, I ended up using 8 boas on my seven and a half-foot tree, although next year I would probably add a couple more to the total… So if you try this yourself, just keep the size of your tree in mind!

Merry Christmas & Happy Decorating!

Why I decided to spend a little more money on my Christmas Decor!

10

Now, don’t get me wrong here, everything that I try to do is always on a budget… but this year, I made the decision to finally spend a little bit of money on my Christmas tree decorations.

Last year I did my tree in 100% Dollar Store decorations, and I completely loved it! Every year, I pick a theme or color that I would like for my tree, and then go out and buy a whole bunch of really cheap décor. It seems like I’m saving money at the time, but when I tally up the total cost of the past years, it really isn’t very great at all! It actually seems a little outrageous and ridiculous… therefore, I decided to put a stop to it this year.
After thinking about it long and hard, I figured out that if I spent a little more money on decorations that I actually love, that I would actually want to reuse them for years to come. This epiphany sent me on a new mission!
My mission was simple:
1. Find tree ornaments that are pretty neutral and can be used with different color schemes throughout the years to come.
2. Find tree ornaments that I really love, and that I would never get tired of looking at!

My mission started in the little, tiny village of Stirling, Ontario where I grew up. Although I no longer reside there, my parents still do and over the last couple of years Stirling has put on an “Over the hills for Christmas” tour. The tour for this year featured 15 different little shops that all get dressed up for Christmas and offer beautiful Christmas décor for purchase!

Unfortunately, with our busy schedule I only had time to make it to two of the shops this year. I actually had to sneak away and tell my husband and children that I was going grocery shopping… Oops!

02

The first shop that I visited is one of my most favorite shops ever, The Vintage Junction! It is here where I found these beautiful ornaments! I instantly fell in love with them and purchased all that they had in stock!

03

04

05

Just down the road from The Vintage Junction, there is another one of my favorite shops to visit called Rustic Routes & Hi Country. This is where I found these decorations. I carefully selected them because they are neutral and will work with other colors in the future. They are also super sparkly and super pretty!!

06

I also decided to spend a little money on my garlands… I chose this beautiful silver, sparkly garland for my tree, to add a little shine! I also bought lots of burlap because, let’s face it – burlap is just classic, and it’s never going out of style! And then I made this DIY White Feather Garland!

07

Another thing that I finally decided to purchase for my tree this year, is a tree skirt! For years and years I have been using table cloths under my tree… slightly embarrassing, or maybe super thrifty! Either way, I tossed in the towel and decided to buy this faux fur tree skirt. Again, it’s super neutral and should be able to work nicely with any future decor schemes!

So there you have it! Even though I spent a little more on my decorations this year, I am actually going to be saving money! A lot of money!

EDIT: Silly me… It was brought to my attention that I forgot to put a picture of my entire Christmas tree in here! Oops!

Here you go!

07

09

DIY Pool Noodle Christmas Wreath!

7Ok – so pool noodles are super-fun right?! You can float around on them, have sword fights and whack people! And although they are super-fun, they definitely aren’t super-pretty… until now, that is!

Who would have thought that you could actually make the perfect wreath form out of a pool noodle? I must admit that when my friend first told me about this, that I was just a little skeptical. However, I actually love this idea and I can’t wait to make another one!

This project was not only simple to create, it was also very budget-friendly, and it really took only about fifteen minutes to complete!

So now, I’m going to share with you just how easy it is, so you can make your very own!

1

The very first things that you are going to need are your pool noodle, and some duct tape… and the very first thing that you are going to do is tape both ends of your pool noodle together so that they are nice and secure.

When devising a wreath out of a pool noodle, one great benefit is that you have the flexibility of changing the size of your wreath by quickly chopping off some of the length of the pool noodle before securing the ends.

2

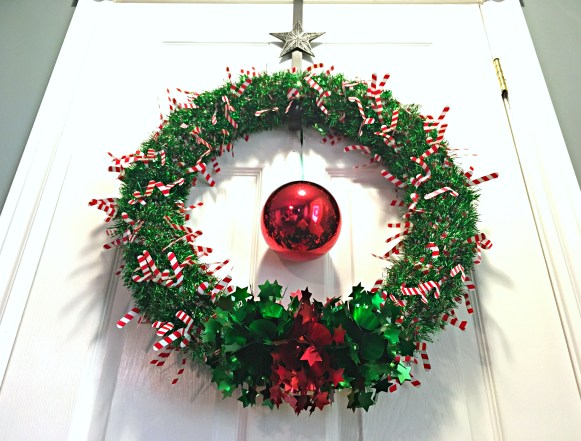
For the next step, you’ll need a hot glue gun and a pretty garland, or ribbon, or whatever type of material that you would like to use. My friend picked out this adorable candy cane garland for me from the dollar store. In total, it took six of these garlands to cover the entire pool noodle.

3

All that I did was hot glue the end of the garland to my pool noodle, and then start wrapping the garland around, while being careful to wrap it tight and keep out any slack. Then I kept wrapping, and wrapping, and wrapping until I got to the other end of the garland. Next, I hot glued the end to the pool noodle.

4

My friend also picked up these really cute bows, so I just hot glued them on as well.

5

I also added a giant red Christmas ball to the middle of my wreath for a little extra pizzazz! To do this, I just simply tied the Christmas ball to the wreath using a green ribbon.

6

And well, that’s pretty much it! So simple, right?! So go ahead and give it a try!

Last Minute Thanksgiving Vignette!

11

Even though our Canadian Thanksgiving has already come and gone, the American Thanksgiving is just around the corner… That’s why I thought that I would take the time to put together a very simple Thanksgiving Vignette to share with my American friends and family!

2

My mom recently gave me this really neat candle holder that is made to sit within a wine bottle. I decided that I wanted to try to build my vignette around this… And instead of using a wine bottle, I would use one of my antique bottles from my collection! (I love my bottles, and I get really excited when I get to use them!)

3

Next I decided that I would use this new serving tray that I just picked up last week. I found this beauty in the old train station in the little town of Stirling where I grew up. The trains and tracks are now long gone, but the old train station is still standing and over the last few years has been filled with beautiful antiques and collectibles, and is now one of my favorite little spots to hit up and see what I can add to The Project Pile!

This tray could be very old, or it could be vintage… I still have to do my research, but can’t wait to find out! I also still have to see if I can find a way to buff out the scratches, but we’ll save that for another day. Any suggestions?!

4

The next thing that I added to my tray were the cobs of corn. I snatched these little guys off of the stalks that I have out on the front porch, and haven’t had the heart to take down yet.

5

I also had some left-over mini pumpkins and gourds, so I added those to my vignette as well.

7a

I then played around with the placement of my antique bottles and the candle, until I came up with something that I liked.

8

I didn’t want to cover the entire tray, because I just love how pretty the patina is, but I still had a lot of bare space on the tray… that’s when I remembered my little supply of bittersweet that I had stocked up on earlier this fall. I just added a few sprigs here and there… and – voila! All finished!

1

It really took only about 10 minutes to throw together this Thanksgiving vignette, and I really, really like it! I hope you have enjoyed this post and feel inspired to create one of your own!

Baked Adzuki Beans

12

Have you ever heard of Adzuki beans before? I hadn’t either until the other day… Or at least I thought I hadn’t!

1

It turns out that Adzuki beans are actually the infamous “red bean” that you are always hearing about… Are you familiar with that super yummy red bean ice cream that you can find at most sushi restaurants? Yep… that’s the Adzuki bean! See? You have heard of them before!

5

These beans are also associated with some pretty amazing health benefits! They are known to play a key part in contributing to the ability to lose weight, to help with the prevention and management of diabetes, lower blood pressure, help increase energy levels, and they are also supposed to have major body-detoxifying effects!

So how did I come across these beans you may be wondering… Well, truth be told, I had to steal them! Yep, that’s right — straight out of the farmer’s field!

9

Well I better explain… My dad is a farmer and part of his business is combining crops for other farmers. This year when I was down visiting he told me about these Adzuki beans that he was going to combine, and how they were a Japanese bean that people eat… I was immediately intrigued and thought that I must get my hands on some of these beans! So we devised the perfect plan!

combine-v001

Since soy-a-beans are a more commonly grown and harvested type of bean in Ontario, we had to clean the combine out really well so no soy-a-beans would get mixed in with the Adzuki beans. Even though the combine was thoroughly cleaned out, the Adzuki beans could be rejected if even one single soy-a-bean is mixed in with them. As an extra precaution, you are supposed to combine a few Adzuki beans first, and then dump them on the ground to clean out the internal parts of the combine before continuing on to harvest the rest. It was these first beans that get dumped out into the field for waste, that I was able to steal!

2

My mom and I filled up a couple of zip lock sandwich bags, and I just couldn’t wait to cook these bad boys up for supper that night!

3

After doing a little recipe researching, I decided that I would use these Adzuki beans to make a more traditional Canadian dish – yummy baked beans! And today, I am going to share this yummy delicious recipe with you! And don’t worry, if you are unable to steal some fresh Adzuki beans straight from the field, you can usually purchase them in the international aisle of your local super market!

11

Prep Time: 60 minutes

Cook Time: 60 minutes

Serves: 6 – 10

What you’ll need:

3 ½ cups of Adzuki Beans

Water (Lots of this!)

1 medium, diced Onion

3 tbsp of butter

¼ tsp of minced Garlic

1 ½ cups of sweetened Apple Sauce

1 cup of Tomato Sauce

¾ of brown or golden Sugar

¼ tsp of Cumin Powder

¼ tsp of Salt

¼ tsp of Black Pepper

1 cup of cooked, diced Bacon (Optional)

Instructions:

Since my beans were fresh from the field, I had to sort through them, (perform my own QA/QC process), and then wash them. If you are purchasing your beans from the store, then you can most likely skip this step!

4

The next thing that you’ll have to do is soften your Adzuki beans before baking them. Add them to a big pot of water and bring them to a boil. Once they are at a boil, turn down the heat, and let them simmer for about an hour. These beans will soak up a lot of water, so make sure that you keep checking them and adding more water as needed.

6

While you are waiting for them to soften, you can prepare all of your other ingredients.

Sautee your bacon, onions, and garlic in the butter with the salt and pepper.

7

Once your beans are all softened, you have two options! You can choose to bake your beans in the oven, or if you have time and love crock pot cooking like I do, you can let them simmer in the crock pot. Since I didn’t have a lot of time that day, I choose to bake mine in the oven.

Either way you choose, you’ll need to set aside ¼ cup of the sugar, and then add all of the other ingredients into your baking dish.

8

Gently fold your beans into the other ingredients so that they don’t break or turn to mush.

Once everything is thoroughly mixed, sprinkle the remaining brown sugar on top.

Cover with foil and bake for one hour. Or let simmer in the crock pot for two to three hours.

The very final step is to eat and enjoy!

11

Mason Jar Pumpkin Candle Holders

000

Yah Halloween! One of my favorite times of the year! Halloween is such a big event in my life, that in my “younger” days, I used to stay up till like 3am in the morning working on my costume during the weeks before Halloween!

Now, x-amount of years later, with two little ones, I have to divvy up my time a little differently…

Being a new blogger, I recently realized that I don’t have any Halloween posts… a HUGE fail! So last week I managed to find a little time to do a little Halloween crafting.

My good friend Lindsey, made the cutest little wine glass Halloween candle holders a couple of weeks ago, and they were SO cute, that I decided to try and create my own version to blog about!17

Crafty has two meanings in my books… 1. Being super creative in an artsy way, and 2. Being super creative in a money-saving way! Therefore, I decided to head out to one of my favorite stores to gather my supplies – The Dollar Store!

1

After checking out the wine glass section of the dollar store, I decided that these gorgeous mason jar wine glasses would make really cute pumpkins! I actually liked them so much, I almost chickened out of painting them… but then remembered that they came from the dollar store, and at that price, I can always buy some more!

2

I already had some acrylic orange paint at home so I decided to use it, but if you don’t have any, the dollar store also sells this too!

3

For some reason, I have this really weird obsession, where I have to mix my own paint colors for everything… even my dining room and office wall colors! Once I made the color that I was happy with, I started applying a base coat to all of my mason jar glasses.

5

I actually ended up applying a total of four coats to my glasses… (Tip: use a soft bristle brush to apply additional coats of paint, and wait until each coat is fully dry before applying another when painting on glass.)

7

After my mason jar pumpkin glasses were all dry, I pulled out my magical Sharpie! Ok, well not really magical, but pretty darn close! And guess what – you can also get Sharpies from the dollar store!

001

I then started turning my pumpkins into Jack-O-Lanterns! I colored on eyes, noses and mouths! I made all of my pumpkin faces a little different, but you can totally make them all of the same if you want!


9

See my new little helper, here?! Miss Soffia Rose, just ten days old! Such a sweetie, and what a great little helper!

10

Although my candle holders were looking pretty cute at this point, I decided that I wanted to add just a little more detail…

12

On the weekend my dad found some bittersweet for me out behind my aunt and uncle’s house… (Hi Aunt Maribeth! Did you wonder what I was doing lurking in the bushes behind your house?! LOL)

11

Anyways, I have been dying to do something with this beautiful bittersweet, so I thought why not add it to my mason jar lids and shape it into little, cutesy pumpkin stems!

13

I then added a pretty little, gold bow! (Ribbon is also available at the dollar store!)

14

And well, here they are!

17

The nice thing about these is that you can leave the lid off if you want to use real candles or tea-lights…

18

Or, if you want to leave the pretty lid on, you can buy flameless candles from the dollar store!

16

A little fall here, a little fall there, 2016 Fall Home Tour!

000Welcome to my home! This is actually the Project Pile’s very first fall home tour — ever! Fall is my favorite season decorating-wise, (and winter is, snowmobiling-wise!)… So I’m very excited to share this post with you!

Let’s start outside!

12

This is the front yard… not a whole lot going on out here yet, but I still love the view! The soy-a-beans are just about ready, and as soon as this rain clears up, I expect that the farmer will be out and ready to harvest them… My little girl Lacee, just loves tractors and combines, and will sit on the front porch and watch once the time comes. (Please ignore the un-mowed grass in this pic! We’ll just blame that on the rain, for now!)

13

This is the backyard, and as you can see, the leaves are just starting to turn… Maybe another week and they will be all ready?! Then we can rake and jump in them!

15

And here is my actual home… Come on in!

00000000

This year, I decided to decorate my front porch with some of my old antique pieces that I have been collecting over the years…

6

Here is my antique wagon wheel, and a few of my antique bottles that have been collected on my family’s 180-year old farm, over the years.

4

And here is my antique milk-can, also from the farm, and an antique ladder, from that area.

3

You can check out my full front porch décor here: A Rustic Fall Front Porch, using Some of my Favorite Antique Pieces!

12

From the front porch, let’s enter into the dining room! Just a little fall décor in here, so far. I still have to do my table-setting, but being the master-procrastinator that I am, probably won’t get it finished till the night before Thanksgiving! I just did a little decorating on the buffet in this room…

4

A few pine cones and flowers here…

3

A few hand-painted and real pumpkins there!

[Psst! You can learn how to hand-paint your own pumpkins here: How To Transform Dollar Store Pumpkins!]

10

You can see my full buffet décor, and learn how I put this look together, here: A Quick & Easy Fall Buffet Makeover!

3

Now let’s mosey on down to the living room! Sorry, the lighting is a little more than off, in here… I love my big, beautiful front porch, but it really seems to hamper the photo-taking quality in this room… Oh well, what can you do?!

11On the way down, we pass my antique barn windows that were used as the seating plan for wedding…

10

All I did here, was switch out my regular white rose garland for some leafy-red sunflowers, and then hung a very simple wreath in the middle. Very colorful, and yet a really, really, simple update for fall!

2

These are my chickens! I actually stole these from my mother! I love them so much, they stay out all year, no matter the season. All I did here to dress them up for fall, was switch out the flowers in my faux flower box for some fall colored ones.

4

I did the same thing for this side-table… just added some more rusty-colored flowers for fall, plus my deer head!

1

Oh, and a few cutesy, little pumpkins too!

14

Oh… and just in case you wanted to see what the other half of my living room looks like, (the half that I always try to hide from you), here it is… Toy City, over here! LOL

6

Let’s head to the kitchen now!

8

Again, just some very simple fall season updates in here!

7

Pretty, mini pumpkins here…

9

Plus a few wicker pumpkins there!    

5

Oh – and let’s not forget my 2 second kitchen table centerpiece! All I did here, was take the leaves off of an old fall garland that I had kicking around, and stuff them into this transparent vase… Doesn’t get much easier than that!

OK… are you ready for my fall bedroom décor?!

Just kidding! I really wanted that to happen, but let’s face it… I’m just not that good! 😉

I really hope you enjoyed this “a little fall here, a little fall there,” 2016 Home Tour! Thanks for stopping by the Project Pile!

10 of the Prettiest Fall Wreaths for your Home!

11Ok, so I have to be honest here…. I started off with owning no wreaths – At all! And now I am like, completely obsessed with them! I just want more and more, and with everything I see, I find myself thinking, “Hmm… that would make such a cute wreath!”

My new-found wreath obsession has driven me to search the internet and compile this list of some of the prettiest fall wreaths out there, for your home, just to share with you… Enjoy! 🙂

1. This gorgeous 45 Second Fall Leaf Wreath from The Creek Line House is not only stunning, but super quick and easy to make… I mean 45s?! Yes, please!12. I love a good monogrammed wreath, and have been wanting one forever… That’s why I finally decided to make this 10-Minute, 10-Dollar Pretty Fall Wreath! Simple and very budget-friendly!2

3. Does anyone else love collecting acorns, as much as I do?! The problem is, that I never know what to do with them all…. Well, problem solved! I can’t wait to make my very own Fall Wreath With Acorns!3

4. How about pine cones?! Is anyone else quite as slightly-obsessed with them, as I am?! They are just so neat when you think about it… And I cannot wait to make my very own Pine Cone Wreath!6

5. Ok, pine cones and acorns?! Mind-blown! This super-creative, Foraged Fall Wreath is a real winner in my books!7

6. Burlap has been in style for quite a while now, and honestly, I just don’t see it going out of style any time soon! So why not create your very own Burlap Wreath, that will remain classic for years to come!5

7. Hydrangeas have also really come into style over the last little while, and I really just can’t get over the beautiful fall colors that were used in this gorgeous, and easy to make Fall Hydrangea Wreath.8

8. I have always loved Indian corn and have seen the really pretty bundles, but I never would have thought to create an Indian Corn Wreath like this one… So simple, yet so beautifully, bold!10

9. Every time I go walking in the woods, I am always on the lookout for the very beautiful, but very elusive bittersweet vine… I haven’t come across one in about 20 years, but as soon as I do, I will definitely be making this stunning, Fall Bittersweet Wreath!4

10. Ok… this Cat Wreath is more of a Halloween wreath than fall, but oh my… it is just SO cute, I just had to include it!9

Just in case you don’t have the time to make your own pretty fall wreath, you can check out these beautiful Fall Wreaths from Amazon!

A Rustic Fall Front Porch, using Some of my Favorite Antique Pieces!

11

I’ve been waiting all summer to get out there and decorate my pretty front porch for fall! To start off, I decided to head out to the old junk pile… ahem… I mean Project Pile, to sort through and pull out some of my antique pieces that I haven’t got to use yet…

5

This old ladder was actually the main inspiration piece for this fall front porch design! I had purchased it a couple of weeks prior to use in the new baby’s room to hold quilts. My main intention was to chalk paint it white, but I really just didn’t have the heart to paint over it’s beautiful, old-looking patina, so I decided to use it for fall instead! I may or may not end up painting it in the future… we’ll just have to wait and see!

2

I grew up on a cash crop farm, so of course, I am quite partial to beautiful cornstalks. Since my family’s farm is about six hours from our home, I ended up purchasing these beautiful stalks from a local farm market in town.

00000000

Same with these giant, gorgeous pumpkins, and the straw bale. Do you like my fall wreath on the front door?!

14

I made it just last week and I think it really works well with the rest of my décor. You can find out how to make one just like it, here!

6

Last summer I found this big beautiful picnic basket at a garage sale for five dollars! I haven’t had a chance to use it yet, so I was really excited when I came up with the idea to set up the straw bale as a picnic area! All that I used was my fall-ish blanket from the dollar store (total score!), my picnic basket, a lantern, for some romantic ambiance… and some of my antique bottles in the beautiful wire basket that was given to me by my wonderful sister-in-law, Julie!

3

To dress it up a little, I added in my antique wagon wheel from my parents 180-year-old farmhouse, a piece of rustic barn board from the gorgeous barn that used to reside behind my neighbor’s house (The Creek Line House), and of course, some mini-pumpkins and gourds!

4

More mini-pumpkins and gourds were placed onto the ladder, because let’s face it… you can never have enough mini-pumpkins and gourds!

8

My lovely antique milk-can is also from my parent’s farm! It’s extra special, because it’s one of those projects that my dad and I did together when I was younger… Painting it white and blue! To keep it simple, I just added in some sunflowers in a mason jar, for an extra pop of color! (Just ignore that green extension cord hanging out in the background!)

7

After finishing up decorating, I noticed that I was missing one key element… A door mat – and did I have the perfect one? Of course not! So I needed to be a little bit creative here, and put on my thinking cap… Then it came to me! I had a couple of pieces of barn board cut into the perfect shape for a mat in the garage… I wasn’t quite sure if it would work or not, but decided to at least try it… And, I love, love, love how it turned out! Definitely extra-rustic!

9

And well, that’s about it… my very rustic fall front porch. Antiques, plus fall harvest items, plus fall foliage, plus a pop of color and a little bit of creativeness!

How to make your own Monogrammed Twine Letter for Less than $2!

15I’ve always wanted a monogrammed letter for my home… the letter ‘G’, to be exact, for our last name, Griffore! For years and years, I have been looking every time I hit up a Michaels or Winners… but every time that I found one that I really liked, it was just a little bit more money than I wanted to spend on a single letter. Especially when I kept thinking how easy it would be to make one…

14

Finally the other night, the perfect opportunity to make my very own monogrammed ‘G’ presented itself! Baby Gri-Gri #2, is due to arrive any day now, and we are so excited! So excited, that we decided to purchase a brand new crib for her! Now, purchasing a crib is one thing… putting it together is completely another! However, while my husband was busy putting it together, I couldn’t help but notice all of the beautiful pieces of Styrofoam packaging, that was just begging to be made into something!

1Our crazy little helper!

The first thing that I had do was steal the perfect piece of Styrofoam from our crazy little helper, before she completely destroyed it all!

2

Next I opened up ‘Microsoft Word on my trusty old lap top, and started flipping through different fonts until I found a ‘G’ that I liked to use as a guide. Now if you were really smart, you could just print your ‘G’ out, cut it out, and trace it onto your Styrofoam! However, my printer has been out of ink since the last school year ended, and I can never-ever remember to buy some more – or even remember to put it on my shopping list… So sad, I know! 🙁

7

Due to our major shortage of printer ink, my crazy little helper and I, had to get a little more creative! We ended up using a marker and a small Styrofoam plate to trace around. We then connected the top part of the ‘G’ to the bottom part, and used a straight edge to finish it up.

9

The Styrofoam was a little bit tricky to cut, and I found that a paring knife worked best. I kind of used the same technique that I use to carve my pumpkins… push it straight in, and pull it straight out!

10

After I finished cutting out my letter, it was time to make it pretty! I decided to use twine from the dollar store. It only took me one full roll of twine, plus about a quarter of a roll… so really, less than two-dollars’ worth!

11

All I did was use a hot glue gun to tack on my twine as I wrapped it, here and there, to help keep the twine in place.

12

And then, I just kept wrapping, and wrapping, and – wrapping! After my ‘G’ was completely covered in twine, I went back over any “skinny” looking areas, to thicken them up, to keep the overall shape of my letter consistent.

13

Ta-da! Here it is! Not too shabby, right?! I mean it’s not perfect, but that’s ok… it’s just very rustic looking! And I mean, like it only cost two dollars! You totally can’t beat that!

14


It turned out just perfect for my Ten-Minute, Two-Dollar Wreath!  

So go ahead, give it a try! And remember, you don’t have to just use twine… try burlap, or your favorite ribbon! Post your pics in the comments below, as I would love to see them! 🙂