
Well, I’m pretty sure that we just had frost again the other night… but I don’t care because its April, and we all know what that means! April showers bring May flowers, and I just can’t wait!

Well, I’m pretty sure that we just had frost again the other night… but I don’t care because its April, and we all know what that means! April showers bring May flowers, and I just can’t wait!

If you happened to catch some of my more recent posts, you may have caught my DIY Easter Bunny Family Décor that I made using, moss, paint, material and burlap…
Well, I ended up having a ton of the spring-patterned fabric that I used left over, so I needed some way to use it up… Continue reading

Can you believe that I never really had any Easter décor, before last year?! I still kind of can’t even believe it myself! I guess it’s because Easter is usually a pretty big traveling holiday for us.
However, since I’m now a mom, I decided that I should probably put on my mom-hat, hunker down and buy some Easter décor. So I did… but I tried to be very wise about it! Continue reading

Are you having trouble finding the perfect garland for your Christmas tree? Or perhaps you are just a little bit tired of the shiny tinsel garlands that just seem to be everywhere… Either way, the perfect garland can be hard to come by, and a garland can either make or break your Christmas tree!
If you’re having trouble finding the perfect garland, then why not make your own?! That’s why I’ve compiled this list of very easy DIY garlands that you can easily make yourself!
Whether your style is fancy, natural, rustic, classic, or just plain easy, there is something on this list just for you! And remember, you can take these different DIY garland ideas and apply your own color scheme to them or even put your own creative twist on them to make them just perfect for your tree!
Pretty Burlap Garland devised by Simply Notable

DIY Deco Mesh Garland devised by The Bajan Texan

DIY Cotton Ball Pom Pom Garland devised by Home Remedies
The Easiest Tree Garland Ever devised by Scout & Nimble

DIY White Feather Boa Garland devised by The Project Pile (This is what I came up with this year, and I just love it! Next year I’m thinking of maybe trying the same idea, only in either red or black… Can’t wait! Would you like to check out the rest of my Christmas tree decorations and ornaments?! You can read all about how I decided to spend a little more money on my Christmas decorations this year, and how I very carefully chose each ornament, and where exactly I found them, right here!)

Easy Cowboy Garland devised by North Pole West

DIY Wine Cork Garland devised by Fun Holiday Crafts

DIY Dried Orange Garland devised by Garden Matter

Paper Garland devised by A Cup of Thuy

Old Fashioned Popcorn Garland devised by For Rent.com


Last year during the end-of-the-season Christmas sales I happened upon this beautiful white feather Christmas tree… Even though Christmas was over, I decided to purchase it and save it for next year. So when Christmas rolled around this year, I was so excited for it! And I actually decided to use it as the inspiration piece for the rest of my Christmas décor… Light, white and airy!

I started thinking about how I would incorporate the tree into my décor and think about what other elements would go nicely with it. It hit me at about 2am in the morning… I woke up, and thought feather boa garland!

And where is the best place to get white feather boas from? Why, the dollar store – of course!

(Notice that there aren’t any white boas in this pic… that’s because I already bought them all!)
And that’s how my white feather boa idea was born!
The next day I headed out to the dollar store, and purchased 8 white feather boas. I brought them home and was so excited to add them to my tree!
All I did was add them to my tree…

And then tie the ends together! Yes – it was that simple!

I found that it was actually easier to add them to the tree before tying them together. Then I fluffed up the feathers to hide the knots.

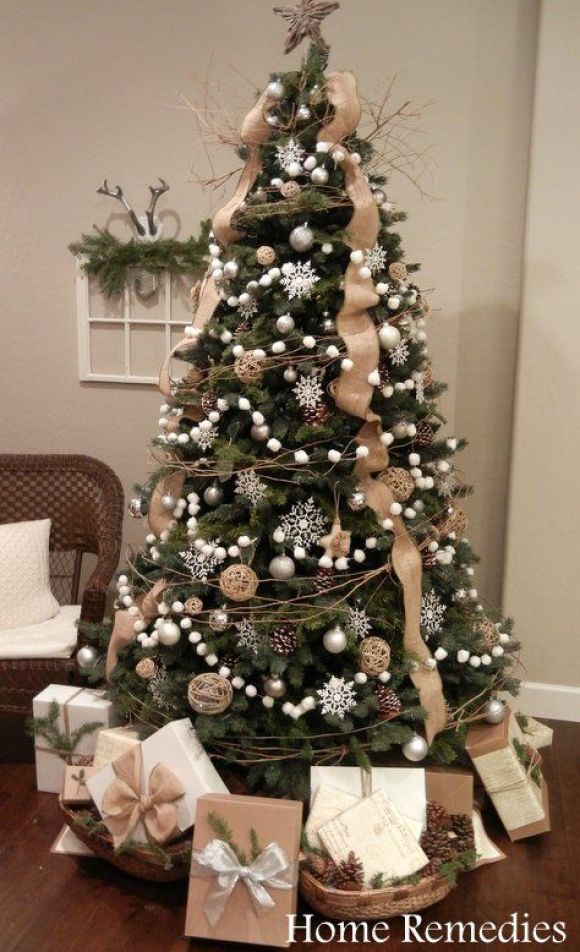
I really love how this DIY garland worked out… It certainly is light, white and airy! When the lights are turned on it kind of looks like a nice fresh snow has just fallen onto my Christmas tree!

Next year, I’m thinking of doing the same thing, only maybe trying a different color… like black, or red, or even purple! (Psst! Do you like my tree? Check out why I decided to spend a little more money on my Christmas Décor, this year!)

Just to summarize, I ended up using 8 boas on my seven and a half-foot tree, although next year I would probably add a couple more to the total… So if you try this yourself, just keep the size of your tree in mind!
Merry Christmas & Happy Decorating!

Now, don’t get me wrong here, everything that I try to do is always on a budget… but this year, I made the decision to finally spend a little bit of money on my Christmas tree decorations.
Last year I did my tree in 100% Dollar Store decorations, and I completely loved it! Every year, I pick a theme or color that I would like for my tree, and then go out and buy a whole bunch of really cheap décor. It seems like I’m saving money at the time, but when I tally up the total cost of the past years, it really isn’t very great at all! It actually seems a little outrageous and ridiculous… therefore, I decided to put a stop to it this year.
After thinking about it long and hard, I figured out that if I spent a little more money on decorations that I actually love, that I would actually want to reuse them for years to come. This epiphany sent me on a new mission!
My mission was simple:
1. Find tree ornaments that are pretty neutral and can be used with different color schemes throughout the years to come.
2. Find tree ornaments that I really love, and that I would never get tired of looking at!
My mission started in the little, tiny village of Stirling, Ontario where I grew up. Although I no longer reside there, my parents still do and over the last couple of years Stirling has put on an “Over the hills for Christmas” tour. The tour for this year featured 15 different little shops that all get dressed up for Christmas and offer beautiful Christmas décor for purchase!
Unfortunately, with our busy schedule I only had time to make it to two of the shops this year. I actually had to sneak away and tell my husband and children that I was going grocery shopping… Oops!

The first shop that I visited is one of my most favorite shops ever, The Vintage Junction! It is here where I found these beautiful ornaments! I instantly fell in love with them and purchased all that they had in stock!


Just down the road from The Vintage Junction, there is another one of my favorite shops to visit called Rustic Routes & Hi Country. This is where I found these decorations. I carefully selected them because they are neutral and will work with other colors in the future. They are also super sparkly and super pretty!!

I also decided to spend a little money on my garlands… I chose this beautiful silver, sparkly garland for my tree, to add a little shine! I also bought lots of burlap because, let’s face it – burlap is just classic, and it’s never going out of style! And then I made this DIY White Feather Garland!

Another thing that I finally decided to purchase for my tree this year, is a tree skirt! For years and years I have been using table cloths under my tree… slightly embarrassing, or maybe super thrifty! Either way, I tossed in the towel and decided to buy this faux fur tree skirt. Again, it’s super neutral and should be able to work nicely with any future decor schemes!
So there you have it! Even though I spent a little more on my decorations this year, I am actually going to be saving money! A lot of money!
EDIT: Silly me… It was brought to my attention that I forgot to put a picture of my entire Christmas tree in here! Oops!
Here you go!


 Ok – so pool noodles are super-fun right?! You can float around on them, have sword fights and whack people! And although they are super-fun, they definitely aren’t super-pretty… until now, that is!
Who would have thought that you could actually make the perfect wreath form out of a pool noodle? I must admit that when my friend first told me about this, that I was just a little skeptical. However, I actually love this idea and I can’t wait to make another one!
This project was not only simple to create, it was also very budget-friendly, and it really took only about fifteen minutes to complete!
So now, I’m going to share with you just how easy it is, so you can make your very own!

The very first things that you are going to need are your pool noodle, and some duct tape… and the very first thing that you are going to do is tape both ends of your pool noodle together so that they are nice and secure.
When devising a wreath out of a pool noodle, one great benefit is that you have the flexibility of changing the size of your wreath by quickly chopping off some of the length of the pool noodle before securing the ends.

For the next step, you’ll need a hot glue gun and a pretty garland, or ribbon, or whatever type of material that you would like to use. My friend picked out this adorable candy cane garland for me from the dollar store. In total, it took six of these garlands to cover the entire pool noodle.

All that I did was hot glue the end of the garland to my pool noodle, and then start wrapping the garland around, while being careful to wrap it tight and keep out any slack. Then I kept wrapping, and wrapping, and wrapping until I got to the other end of the garland. Next, I hot glued the end to the pool noodle.

My friend also picked up these really cute bows, so I just hot glued them on as well.

I also added a giant red Christmas ball to the middle of my wreath for a little extra pizzazz! To do this, I just simply tied the Christmas ball to the wreath using a green ribbon.
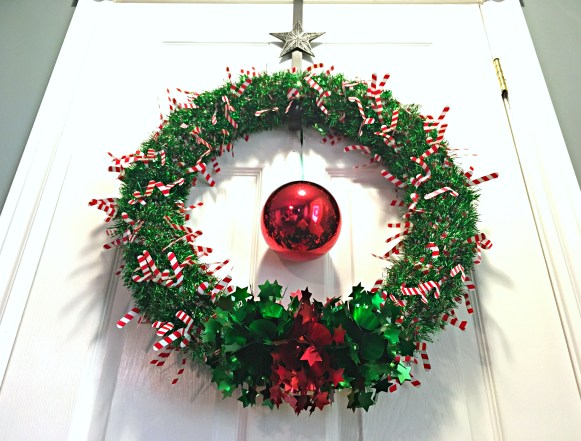
And well, that’s pretty much it! So simple, right?! So go ahead and give it a try!
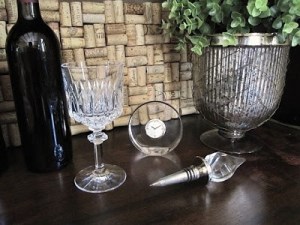
 Do you have a bunch of left over wine corks, like I do?! I have so many saved up from over the years, and they are just so pretty that I never have the heart to throw them out! Well it’s finally time to figure out what to do with these little guys, so I started taking a look on Pinterest.com, and boy… the options are endless!
There are so many great ideas out there, that I actually feel even more confused on which one I should try! I did however, pick out my top ten favorites to share with you! So take a look and let me know which one is your favorite!

2. Ah, the classic DIY Cork Coasters…. They are so modernly chic and are really simple to make too!

3. I am SO in love with this beautiful Cork Planter Box!

4. This gorgeous Wine Cork Backsplash would make the perfect addition to any kitchen! This picture is actually of the inside of a cabinet that was done… So beautiful!
5. How cute are these Wine Cork Keychains?! And what perfect gifts they would make!

6. These Wine Cork Candle Holders are so easy to make, yet add such an elegant ambiance to any room in your home!

7. Ok, ok… I know that it’s not quite fall yet, but this Wine Cork Pumpkin was soooo cute, that I just couldn’t resist adding it to this list!

8. Check out this fantastic Wine Cork Table Top! It would go perfect in my living room!

9. Ok, if you ask me, this Dart Board Surround Cabinet is just brilliant! Not only does it completely serve a purpose, it is also a super chic piece of wall decor!

10. This Wine Cork Letter Decor is so cute and creative! Perfect for weddings, or even just to spruce up your home bar.

Well, like I mentioned above, I love ALL of these beautiful wine cork projects! I guess I’ll just have to keep drinking so I can make them all! 😉
If you aren’t a wine drinker, but still love the look of wine cork decor, you can purchase wine corks from here!

Easter bunnies! Dollar store Easter bunnies! Ok, so the little Easter bunnies that I picked up from the dollar store are so, so, so cute…. however, their cute little pink ears, and their cute beady little eyes just weren’t one-hundred percent meshing with the rest of my Easter decor…. I was looking for something with the same cuteness level, but slightly more neutral. (Yes — even more neutral than an already white Easter bunny…. silly, I know!)
Lately I have been on a “White-Ochre” chalk-painting spree…. I’ve recently painted my antique-tin-ceiling wall-art, my serving tray, my buffet, and even my giant spoon and my giant fork! So I thought — why not?
It took two coats of chalk-paint to get the perfect look. The already-white surface covered super-easy, but the eyes and ears took a couple of super-thick coats. And just an FYI, when painting on this type of material, you have to wait for the paint to completely dry in between coats, or else it won’t stick properly.
I originally saw this idea over at The Creek Line House! Only instead of using chalk paint, she used this really neat “Mirror Effect” spray paint…. and wow — did those bunnies turn out amazing! (Check it out here!)
So basically, you can update your dollar store bunnies with whatever paint you have on hand, and you can use any color you like too! It’s such an easy, simple and cute way to customize your very own home decor!
I personally think that these cute little bunnies turned out amazing! I couldn’t be more happy with them, and I can’t wait for you to see them incorporated with all of my other Easter decor…. but, we’ll save that for another day…. So make sure you stop back by The Project Pile to check it out!
HERE ARE MORE DIY IDEAS TO TRY!
An “easy as pie” DIY Rag Wreath for Spring!
DIY Barnboard Bunny Family Art Deco
Easy, Breezy, Beautiful Easter Décor! (All you really need are a few good pieces!)
DIY Distressed Pillar Candle Holders
Hutch Make-Over with Chalk Paint!

*This post may contain affiliate links.*
Ahh… Welcome to the great-outdoors — Of my front yard, that is!
When we moved into our cozy, dream-home, one of the things that I was so excited about, was the pretty front porch that I would get to decorate! Since decorating a ginormous front porch can get a little costly, I tried to use items that I already had, plus lots of greenery from the back yard.
I made my very own Cedar Boughs with some wire and pliers. I then made these super-easy, 2-Minute Bows, from only one roll of geo-mesh for $10.  To dress up the area around the front doors, I made very, very simple Christmas urns. I used my cheap summer flower pots, but spray-painted them all a metallic-black color to make them match. Next I stuck boughs of Spruce into the pots, and then tied very simple mini-version-bows onto the boughs.
  Last night when I was about to do my photo shoot, I realized that I didn’t have a wreath for my door — a major faux-pas! So in house-coat, high-heels (because they were the closest shoes to me??!), I dug out the ladder to find my old Christmas wreath…. It wasn’t anywhere! Panic-Alert!!!! So after running around trying to come up with something else to use, I found this cute, little, tin-bucket and stuck some old garland and branches of cedar in it. Whew — Crisis averted!
Matt, (my husband), was in charge of the Christmas lights, and I must say, he did a fabulous job! Below is my big, beautiful, grape-vine wreath that my wonderful mother made for our wedding! It’s about 5 feet in diameter, and I absolutely love it! All I did to “Christmas-Up” my wreath was add some lights to it, wrap it in red geo-mesh, and add a matching cedar bough and bow to it. It’s so sparkly and pretty… definitely my favorite piece of holiday decor, this year!
  Total cost for this front porch Christmas decor, $21.00!!!! $10.00 on geo-mesh, and $11.00 on spray paint…. Now, all we need is some snow!!!!!!!