10 Fabulous & Totally-Not-Boring Kitchen Backsplashes that will make your kitchen look like a Million Bucks!

Good day y’all! So lately, I have been dream, dream, dreaming about redoing my kitchen in a rustic-chic, elegant-but-bold, brick backsplash! Yes, I am going to actually do this…One day. (Hopefully sooner than later!)

I’ve been researching and creating my dream kitchen mood board, which I will be sharing with you once it is complete!

Putting this mood board together got me to’ thinking… What other fabulous and totally-not-boring kitchen backsplashes are out there? Are there any that I might like better than my very much dreamed about brick?!

Well, it turns out that there are actually some pretty darn fabulous and totally-not-boring backsplash ideas out there! Although brick is still number one on my list, I decided to create a top ten list of my favorite picks, just to share with you!

If I couldn’t get my brick backsplash, I would definitely have a tough time deciding what backsplash I would choose instead! I’m even secretly dreaming of implementing one of these fancy designs in the downstairs powder room! (Shh! Don’t tell my husband!)

So, here we go!

Brick Backsplash devised by Welke

Copper Backsplash devised by The Times New Roman

Corrugated Metal Backsplash devised by Unique Home Stays

White Arabesque Glass Tile devised by Subway Tile Outlet

Slate Backsplash devised by Make King

Reclaimed Wood Backsplash devised by Design Sponge

Marble Backsplash devised by Blood & Champagne

3-D Mosaic Backsplash devised by HGTV

Penny Round Tile Backsplash devised by Regan Baker Design Inc.

24K Gold Backsplash devised by New Ravenna

Obviously, I’m stuck on the brick! But, which one would you choose?!

Do you already have one of these designs in your kitchen or bathroom? Or do you have something else that is completely fabulous and totally-not-boring?! I would love to see! Post a pic in the comments, please!

Psst! Love these backsplashes, but looking for some ideas that are a little easier on the budget, yet will have a huge impact on any kitchen or bathroom?! Check out some of my special picks from Amazon, right here!

15 things to get rid of RIGHT NOW! (Clean, Organize, De-Clutter)

15 things to get rid of RIGHT NOW! (Clean, Organize, De-Clutter)For the last little while, I have really been trying to crack down on annoying, stuffy clutter. Every day when I’m going about my daily tasks around my home, I’m always looking for and thinking about different things that I can toss out. I have created this list of quick and easy things to get rid of right now, to help you clean, organize, and de-clutter your home!

I always say, it doesn’t matter how big your house or your garage is, you will always fill it! (So true in my case!)

My parents always referred to me as a “pack-rat” (yep – that happened!), when I was little because I collected literally everything!

If you are anything like me, you have a little bit of a hard time getting rid of things that have sentimental value, and if you toss something out, you feel a little bit of that pesky guilt or anxiety start to kick in…wa Continue reading

A Christmas Home Tour featuring some of my favorite Antique & Vintage Collectibles

00

Oh Christmas! I started decorating for Christmas really early this year, and shopping! But somehow, I’m just finally finishing now… And Christmas is almost here! Oh life!

This year, I decided to head out to The Project Pile sitting out in the garage and pull out some of my favorite pieces that I have been saving for certain rooms in my home, that I just have not gotten to yet. And I’m actually really excited to finally share some of my precious finds with you!

Now, let’s get to the home tour! (Lots of pics for you this year!)

I started out with my tree this year. I posted about this earlier, in an article called Why I decided to spend a little more money on my Christmas Decor!

09

5

04

(And oh my goodness… I just noticed the little red fuzzy hanging out in this pic! Photo fail! LOL!)

My whole “white-feather” Christmas tree was inspired by this mini white feather Christmas tree, that I purchased last year at the end of the season.

01

This little tree gave me the idea to create a garland out of white feather boas. If you like this look and would like to learn how to create your own, you can check it out here.

02

08

I put my tree in a new spot this year. (I think I actually might have put one tree here the first year that we moved here, and had three trees because I was in some super-crazy Christmas-spirit-trance! That was also back in the days before kids…)

6

I’ve started referring to this section of the house as the “teacup room”, since this is where I now am able to display my beautiful antique teacups.

3

Two from my grandmother, and two from my mother-in-law, Judy… I just love them!

2

7

I also have my barn windows hanging in this area of our home.

4

These were used for the seating charts in our Autumn Harvest Barn Wedding!

1

Now… moving into the dining room!

12

13

15

I really wanted to incorporate a few of my antique pieces into my table setting, so I used this antique wood and copper tray that I was able to pick up a few months ago… And I finally got to use my antique bowling pins! I picked these up in Michigan a couple of summers ago, and they’ve just been sitting in The Project Pile, waiting for the perfect moment to shine!

14

16

Over on my antique buffet I finally decided to pull out some beauties that I have been saving for my laundry room… But it currently has a leaky ceiling, so that definitely needs to be fixed first!

25

27

(Psst! Like my pears?! They’re kinda Christmasy, right?! A partridge in a pear tree!!!)

19

I found this pretty glass washboard at a flea market two summers ago! It’s going to look pretty stellar on my laundry room wall! Someday…

20

I also found this beautiful antique laundry roller at the same flea market. I paid $50 for it, but I have seen them online for up to $600! Total score! It’s also going to look awesome in my future laundry room makeover!

21

Up above on my oak shelves, are some pretty stoneware plates that my good friend gave me to put up there when I first got the shelves. I haven’t done any research yet, but I’m betting that they are pretty old too!

26

18

I’ve also got a few pieces from my antique bottle collection mixed in on these shelves, as well as the massive cast iron and wooden antique pulley from the farm where I grew up.

17

22

All of these bottles were personally hand dug from the fence-lines of the 179 year-old farmhouse. These are just a few of hundreds that have been found! (Someday maybe I’ll actually get to cataloging them!)

I’m so happy that I’ve finally started pulling some more collectibles out of The Project Pile, so I can actually enjoy them in my home, as well as share them with you!

Here’s to looking forward to seeing what I can dig out for next time!

DIY Christmas Tree Garlands

01

Are you having trouble finding the perfect garland for your Christmas tree? Or perhaps you are just a little bit tired of the shiny tinsel garlands that just seem to be everywhere… Either way, the perfect garland can be hard to come by, and a garland can either make or break your Christmas tree!

If you’re having trouble finding the perfect garland, then why not make your own?! That’s why I’ve compiled this list of very easy DIY garlands that you can easily make yourself!

Whether your style is fancy, natural, rustic, classic, or just plain easy, there is something on this list just for you! And remember, you can take these different DIY garland ideas and apply your own color scheme to them or even put your own creative twist on them to make them just perfect for your tree!

Pretty Burlap Garland devised by Simply Notable

01-burlap-garland

DIY Deco Mesh Garland devised by The Bajan Texan

02-deco-mesh

DIY Cotton Ball Pom Pom Garland devised by Home Remedies

03-cotton-balls

The Easiest Tree Garland Ever devised by Scout & Nimble

04-easiest-garland

DIY White Feather Boa Garland devised by The Project Pile (This is what I came up with this year, and I just love it! Next year I’m thinking of maybe trying the same idea, only in either red or black… Can’t wait! Would you like to check out the rest of my Christmas tree decorations and ornaments?! You can read all about how I decided to spend a little more money on my Christmas decorations this year, and how I very carefully chose each ornament, and where exactly I found them, right here!)

02

Easy Cowboy Garland devised by North Pole West

05-cowboy

DIY Wine Cork Garland devised by Fun Holiday Crafts

06-wine-cork

DIY Dried Orange Garland devised by Garden Matter

07-dried-fruit

Paper Garland devised by A Cup of Thuy

08

Old Fashioned Popcorn Garland devised by For Rent.com

09-popcorn

DIY Feather Boa Garland

10

Last year during the end-of-the-season Christmas sales I happened upon this beautiful white feather Christmas tree… Even though Christmas was over, I decided to purchase it and save it for next year. So when Christmas rolled around this year, I was so excited for it! And I actually decided to use it as the inspiration piece for the rest of my Christmas décor… Light, white and airy!

01

I started thinking about how I would incorporate the tree into my décor and think about what other elements would go nicely with it. It hit me at about 2am in the morning… I woke up, and thought feather boa garland!

02

And where is the best place to get white feather boas from? Why, the dollar store – of course!

03

(Notice that there aren’t any white boas in this pic… that’s because I already bought them all!)

And that’s how my white feather boa idea was born!

The next day I headed out to the dollar store, and purchased 8 white feather boas. I brought them home and was so excited to add them to my tree!

All I did was add them to my tree…

04

And then tie the ends together! Yes – it was that simple!

05

I found that it was actually easier to add them to the tree before tying them together. Then I fluffed up the feathers to hide the knots.

06

I really love how this DIY garland worked out… It certainly is light, white and airy! When the lights are turned on it kind of looks like a nice fresh snow has just fallen onto my Christmas tree!

08

Next year, I’m thinking of doing the same thing, only maybe trying a different color… like black, or red, or even purple! (Psst! Do you like my tree? Check out why I decided to spend a little more money on my Christmas Décor, this year!)

07

Just to summarize, I ended up using 8 boas on my seven and a half-foot tree, although next year I would probably add a couple more to the total… So if you try this yourself, just keep the size of your tree in mind!

Merry Christmas & Happy Decorating!

Why I decided to spend a little more money on my Christmas Decor!

10

Now, don’t get me wrong here, everything that I try to do is always on a budget… but this year, I made the decision to finally spend a little bit of money on my Christmas tree decorations.

Last year I did my tree in 100% Dollar Store decorations, and I completely loved it! Every year, I pick a theme or color that I would like for my tree, and then go out and buy a whole bunch of really cheap décor. It seems like I’m saving money at the time, but when I tally up the total cost of the past years, it really isn’t very great at all! It actually seems a little outrageous and ridiculous… therefore, I decided to put a stop to it this year.
After thinking about it long and hard, I figured out that if I spent a little more money on decorations that I actually love, that I would actually want to reuse them for years to come. This epiphany sent me on a new mission!
My mission was simple:
1. Find tree ornaments that are pretty neutral and can be used with different color schemes throughout the years to come.
2. Find tree ornaments that I really love, and that I would never get tired of looking at!

My mission started in the little, tiny village of Stirling, Ontario where I grew up. Although I no longer reside there, my parents still do and over the last couple of years Stirling has put on an “Over the hills for Christmas” tour. The tour for this year featured 15 different little shops that all get dressed up for Christmas and offer beautiful Christmas décor for purchase!

Unfortunately, with our busy schedule I only had time to make it to two of the shops this year. I actually had to sneak away and tell my husband and children that I was going grocery shopping… Oops!

02

The first shop that I visited is one of my most favorite shops ever, The Vintage Junction! It is here where I found these beautiful ornaments! I instantly fell in love with them and purchased all that they had in stock!

03

04

05

Just down the road from The Vintage Junction, there is another one of my favorite shops to visit called Rustic Routes & Hi Country. This is where I found these decorations. I carefully selected them because they are neutral and will work with other colors in the future. They are also super sparkly and super pretty!!

06

I also decided to spend a little money on my garlands… I chose this beautiful silver, sparkly garland for my tree, to add a little shine! I also bought lots of burlap because, let’s face it – burlap is just classic, and it’s never going out of style! And then I made this DIY White Feather Garland!

07

Another thing that I finally decided to purchase for my tree this year, is a tree skirt! For years and years I have been using table cloths under my tree… slightly embarrassing, or maybe super thrifty! Either way, I tossed in the towel and decided to buy this faux fur tree skirt. Again, it’s super neutral and should be able to work nicely with any future decor schemes!

So there you have it! Even though I spent a little more on my decorations this year, I am actually going to be saving money! A lot of money!

EDIT: Silly me… It was brought to my attention that I forgot to put a picture of my entire Christmas tree in here! Oops!

Here you go!

07

09

DIY Pool Noodle Christmas Wreath!

7Ok – so pool noodles are super-fun right?! You can float around on them, have sword fights and whack people! And although they are super-fun, they definitely aren’t super-pretty… until now, that is!

Who would have thought that you could actually make the perfect wreath form out of a pool noodle? I must admit that when my friend first told me about this, that I was just a little skeptical. However, I actually love this idea and I can’t wait to make another one!

This project was not only simple to create, it was also very budget-friendly, and it really took only about fifteen minutes to complete!

So now, I’m going to share with you just how easy it is, so you can make your very own!

1

The very first things that you are going to need are your pool noodle, and some duct tape… and the very first thing that you are going to do is tape both ends of your pool noodle together so that they are nice and secure.

When devising a wreath out of a pool noodle, one great benefit is that you have the flexibility of changing the size of your wreath by quickly chopping off some of the length of the pool noodle before securing the ends.

2

For the next step, you’ll need a hot glue gun and a pretty garland, or ribbon, or whatever type of material that you would like to use. My friend picked out this adorable candy cane garland for me from the dollar store. In total, it took six of these garlands to cover the entire pool noodle.

3

All that I did was hot glue the end of the garland to my pool noodle, and then start wrapping the garland around, while being careful to wrap it tight and keep out any slack. Then I kept wrapping, and wrapping, and wrapping until I got to the other end of the garland. Next, I hot glued the end to the pool noodle.

4

My friend also picked up these really cute bows, so I just hot glued them on as well.

5

I also added a giant red Christmas ball to the middle of my wreath for a little extra pizzazz! To do this, I just simply tied the Christmas ball to the wreath using a green ribbon.

6

And well, that’s pretty much it! So simple, right?! So go ahead and give it a try!

Last Minute Thanksgiving Vignette!

11

Even though our Canadian Thanksgiving has already come and gone, the American Thanksgiving is just around the corner… That’s why I thought that I would take the time to put together a very simple Thanksgiving Vignette to share with my American friends and family!

2

My mom recently gave me this really neat candle holder that is made to sit within a wine bottle. I decided that I wanted to try to build my vignette around this… And instead of using a wine bottle, I would use one of my antique bottles from my collection! (I love my bottles, and I get really excited when I get to use them!)

3

Next I decided that I would use this new serving tray that I just picked up last week. I found this beauty in the old train station in the little town of Stirling where I grew up. The trains and tracks are now long gone, but the old train station is still standing and over the last few years has been filled with beautiful antiques and collectibles, and is now one of my favorite little spots to hit up and see what I can add to The Project Pile!

This tray could be very old, or it could be vintage… I still have to do my research, but can’t wait to find out! I also still have to see if I can find a way to buff out the scratches, but we’ll save that for another day. Any suggestions?!

4

The next thing that I added to my tray were the cobs of corn. I snatched these little guys off of the stalks that I have out on the front porch, and haven’t had the heart to take down yet.

5

I also had some left-over mini pumpkins and gourds, so I added those to my vignette as well.

7a

I then played around with the placement of my antique bottles and the candle, until I came up with something that I liked.

8

I didn’t want to cover the entire tray, because I just love how pretty the patina is, but I still had a lot of bare space on the tray… that’s when I remembered my little supply of bittersweet that I had stocked up on earlier this fall. I just added a few sprigs here and there… and – voila! All finished!

1

It really took only about 10 minutes to throw together this Thanksgiving vignette, and I really, really like it! I hope you have enjoyed this post and feel inspired to create one of your own!

A little fall here, a little fall there, 2016 Fall Home Tour!

000
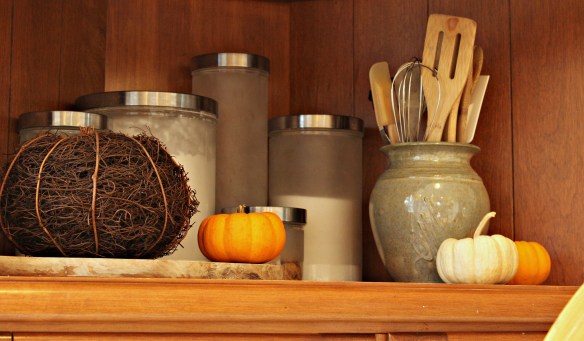
Welcome to my home! This is actually the Project Pile’s very first fall home tour — ever! Fall is my favorite season decorating-wise, (and winter is, snowmobiling-wise!)… So I’m very excited to share this post with you!

Let’s start outside!

12

This is the front yard… not a whole lot going on out here yet, but I still love the view! The soy-a-beans are just about ready, and as soon as this rain clears up, I expect that the farmer will be out and ready to harvest them… My little girl Lacee, just loves tractors and combines, and will sit on the front porch and watch once the time comes. (Please ignore the un-mowed grass in this pic! We’ll just blame that on the rain, for now!)

13

This is the backyard, and as you can see, the leaves are just starting to turn… Maybe another week and they will be all ready?! Then we can rake and jump in them!

15

And here is my actual home… Come on in!

00000000

This year, I decided to decorate my front porch with some of my old antique pieces that I have been collecting over the years…

6

Here is my antique wagon wheel, and a few of my antique bottles that have been collected on my family’s 180-year old farm, over the years.

4

And here is my antique milk-can, also from the farm, and an antique ladder, from that area.

3

You can check out my full front porch décor here: A Rustic Fall Front Porch, using Some of my Favorite Antique Pieces!

12

From the front porch, let’s enter into the dining room! Just a little fall décor in here, so far. I still have to do my table-setting, but being the master-procrastinator that I am, probably won’t get it finished till the night before Thanksgiving! I just did a little decorating on the buffet in this room…

4

A few pine cones and flowers here…

3

A few hand-painted and real pumpkins there!

[Psst! You can learn how to hand-paint your own pumpkins here: How To Transform Dollar Store Pumpkins!]

10

You can see my full buffet décor, and learn how I put this look together, here: A Quick & Easy Fall Buffet Makeover!

3

Now let’s mosey on down to the living room! Sorry, the lighting is a little more than off, in here… I love my big, beautiful front porch, but it really seems to hamper the photo-taking quality in this room… Oh well, what can you do?!

11On the way down, we pass my antique barn windows that were used as the seating plan for wedding…

10

All I did here, was switch out my regular white rose garland for some leafy-red sunflowers, and then hung a very simple wreath in the middle. Very colorful, and yet a really, really, simple update for fall!

2

These are my chickens! I actually stole these from my mother! I love them so much, they stay out all year, no matter the season. All I did here to dress them up for fall, was switch out the flowers in my faux flower box for some fall colored ones.

4

I did the same thing for this side-table… just added some more rusty-colored flowers for fall, plus my deer head!

1

Oh, and a few cutesy, little pumpkins too!

14

Oh… and just in case you wanted to see what the other half of my living room looks like, (the half that I always try to hide from you), here it is… Toy City, over here! LOL

6

Let’s head to the kitchen now!

8

Again, just some very simple fall season updates in here!

7

Pretty, mini pumpkins here…

9

Plus a few wicker pumpkins there!    

5

Oh – and let’s not forget my 2 second kitchen table centerpiece! All I did here, was take the leaves off of an old fall garland that I had kicking around, and stuff them into this transparent vase… Doesn’t get much easier than that!

OK… are you ready for my fall bedroom décor?!

Just kidding! I really wanted that to happen, but let’s face it… I’m just not that good! 😉

I really hope you enjoyed this “a little fall here, a little fall there,” 2016 Home Tour! Thanks for stopping by the Project Pile!

10 of the Prettiest Fall Wreaths for your Home!

11
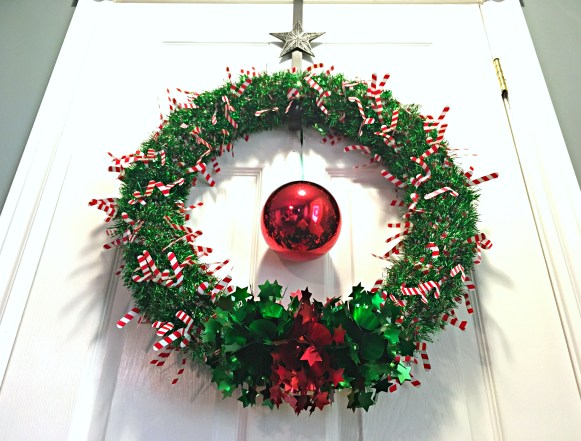
Ok, so I have to be honest here…. I started off with owning no wreaths – At all! And now I am like, completely obsessed with them! I just want more and more, and with everything I see, I find myself thinking, “Hmm… that would make such a cute wreath!”

My new-found wreath obsession has driven me to search the internet and compile this list of some of the prettiest fall wreaths out there, for your home, just to share with you… Enjoy! 🙂

1. This gorgeous 45 Second Fall Leaf Wreath from The Creek Line House is not only stunning, but super quick and easy to make… I mean 45s?! Yes, please!12. I love a good monogrammed wreath, and have been wanting one forever… That’s why I finally decided to make this 10-Minute, 10-Dollar Pretty Fall Wreath! Simple and very budget-friendly!2

3. Does anyone else love collecting acorns, as much as I do?! The problem is, that I never know what to do with them all…. Well, problem solved! I can’t wait to make my very own Fall Wreath With Acorns!3

4. How about pine cones?! Is anyone else quite as slightly-obsessed with them, as I am?! They are just so neat when you think about it… And I cannot wait to make my very own Pine Cone Wreath!6

5. Ok, pine cones and acorns?! Mind-blown! This super-creative, Foraged Fall Wreath is a real winner in my books!7

6. Burlap has been in style for quite a while now, and honestly, I just don’t see it going out of style any time soon! So why not create your very own Burlap Wreath, that will remain classic for years to come!5

7. Hydrangeas have also really come into style over the last little while, and I really just can’t get over the beautiful fall colors that were used in this gorgeous, and easy to make Fall Hydrangea Wreath.8

8. I have always loved Indian corn and have seen the really pretty bundles, but I never would have thought to create an Indian Corn Wreath like this one… So simple, yet so beautifully, bold!10

9. Every time I go walking in the woods, I am always on the lookout for the very beautiful, but very elusive bittersweet vine… I haven’t come across one in about 20 years, but as soon as I do, I will definitely be making this stunning, Fall Bittersweet Wreath!4

10. Ok… this Cat Wreath is more of a Halloween wreath than fall, but oh my… it is just SO cute, I just had to include it!9

Just in case you don’t have the time to make your own pretty fall wreath, you can check out these beautiful Fall Wreaths from Amazon!